This chapter contains the following topics:
The Open items selections allow you to modify open items, print an edit list and post the modified open items.
There are also Open item selections to View open items, covered in the View Open Items chapter and Purge open items, covered in the Purge Open Items chapter.
The Open items (Modify) selection has two different modification types that enable you to either:
| • | Change the due date, discount date, or discount balance of existing open items; or, |
| • | Mark an open item as manually paid. |
Either modification type allows you to change a correcting entry to a non-correcting one and vice versa. This feature only applies if you are using the General Ledger module.
Since open items have already been posted, you may not change them directly. What you do instead is create a separate entry in a separate file, called a modification. This modification is itself subject to entry, printing, and posting just as the original payable was. Only after the modification has been posted does the change take effect.
An open item can be modified numerous times. However, at any one time an open item can have at most two modifications pending (one of each type). Once those modifications have posted, another modification can be entered for that open item, and so on, until the open item is paid.
Once an item has been paid it is no longer an open item and cannot be modified. An open item that has been selected for payment, even though not yet paid, may not be modified unless it has been unselected.
Select
Modify from the Open items menu.
This type of modification lets you change the due date, discount date, discount balance, or correcting-entry status of an existing open item.
Graphical Mode:
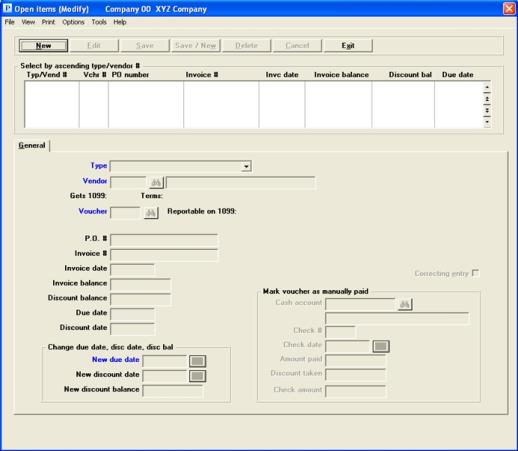
The following screen appears:
From this screen you can work with both new and existing modifications.
The list box displays up to 6 modified open items at a time. You may sort the modified open items by Type/Vendor number in ascending or descending order. Only column names in red may be sorted. Click on the column name or the arrow to the right of the column name to change the sort or use the View options.
To locate a modified open item, start typing the type. You may also use the up/down arrows, Page up, Page down, Home and End keys to locate a voucher. The <F1> and <SF1> function the same as the up/down arrow keys.
Modified open items that display in the list box are available for changes or deletion. The fields for the selected modified open item display in the lower part of the screen.
When a modified open item is found, you may select the <Enter> key or Edit button to start editing.
You may select a button for editing, deleting or adding a new payable:
| Button | Keyboard | Description |
|
New |
Alt+n |
To enter a new modified open item |
|
Delete |
Alt+d |
To delete the modified open item selected in the list box. Selecting <F3> will also delete the modified open item |
|
Edit |
Alt+e |
To edit the modified open item selected in the list box |
|
Save |
Alt+s |
To save a new modified open item or changes to an edited modified open item |
|
Save/New |
Alt+w |
Same as Save button plus the New button |
|
Cancel |
Alt+c |
To cancel adding or editing a modified open item |
|
Exit |
Alt+x |
To exit the screen. You may also use the <Esc> key |
Menu Selections
At the top left of the screen menu selections are available. Most of these are the same from screen to screen. The selections that are unique to this screen are explained here:
Under Print you may select Edit list to print a modified open items edit list.
Under Options you may select Memos to enter new memos or select Memo adjustments to make adjustments to existing memos in history.
Additional Options selections include View vendor invoices and View vendor open items. You may also post modified open items from the Post selection.
Character Mode:
The following screen appears:
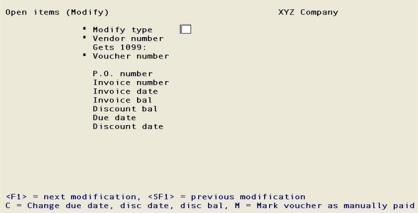
From this screen you can work with both new and existing modifications. If a modification has already been entered for the modification type, vendor number, and voucher number you specify, that modification appears and is available for changes or deletion.
|
Note |
During the posting of an open item marked as manually paid a positive pay file will be generated and a positive pay register will print if: 1. You you are using positive pay and 2. The cash account you choose is set up in Banks for positive pay |
Enter the modification type, which must be one of:
| Character Mode | Graphical Mode | Description |
|
C |
Change due date, discount date, discount bal |
Change due date, discount date, or discount balance |
|
M |
Manual payment |
Mark open item as manually paid |
Options
In character mode, for an existing entry, you may use one of the options:
|
<F1> |
For the next modification |
|
<SF1> |
For the previous modification |
If an existing entry is chosen by use of the option keys, it will display on the screen and the cursor will move to Field number to change?.
|
Format |
Graphical mode: Drop down list Character mode: One letter, either C or M |
|
Example |
Select Change due date, discount date, discount bal |
Options
Enter the vendor number of the open item you wish to modify. This must be a valid vendor in the Vendors selection. You may use one of the options:
|
<F1> |
For the next vendor in vendor number sequence |
|
<SF1> |
For the previous vendor |
|
<F8> |
For selecting a vendor from a list a vendors. From the vendor list window you may select the More info button to view the full data about the vendor. You may also access vendor history from the Options menu |
|
Format |
6 characters |
|
Example |
Press <F1> |
In character mode, if an existing entry is chosen by use of the option keys, it will display on the screen and the cursor will move to Field number to change?.
Gets 1099:
Terms
Upon selection or entry of a valid vendor, the 1099 status and terms description of that vendor appear. These fields cannot be changed.
Options
Enter the voucher number of the open item you wish to modify. There must be an open item and not yet posted for this vendor and voucher number. For an existing entry, you may use one of the options:
|
<F1> |
For this vendor’s next voucher |
|
<SF1> |
For his previous voucher |
Vouchers already selected for computer payment may not be modified. You may however unselect such an open item, whereupon it again becomes eligible for modification. Use Clear selections/deferrals under Prepare payments for this purpose.
|
Format |
999999 |
|
Example |
Press <F1> |
Informational fields
Upon selection or entry of a valid open item, relevant information about that voucher displays. These fields, which are informational only and cannot be changed, include the following:
|
1099 status |
Invoice balance |
|
Purchase order number |
Discount balance |
|
Invoice number |
Due date |
|
Invoice date |
Discount date |
Fields to be modified
In character mode, if this is an existing entry, the information for this open item appears in the numbered fields, the cursor is positioned at Field number to change?, and you may change or delete this modification entry. If this is a new entry, the cursor is positioned at Field #1 for data entry.
In graphical mode, if this is an existing entry and if it is a Change due date, discount date, discount bal type, only the fields in the Change due date, discount date, discount bal section of the screen may be modified. For a Manual payment, most of the fields in Mark voucher as manually paid section can be changed. However, the Cash account cannot be changed. If you are using correcting entries, that field can be changed for both types.
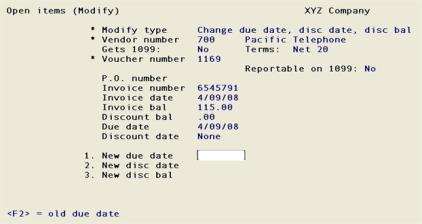
The appearance of the screen at this point depends upon what type of modification this is. The Change due date, discount date, discount bal type, type C in character mode, is considered below.
The screen appears as follows:
Enter the following information:
Options
This may not be earlier than the invoice date. Enter the new due date, or use the option:
|
<F2> |
To retain the old due date |
|
Format |
MMDDYY |
|
Example |
Press <F2> |
Options
This may not be earlier than the invoice date nor later than the new due date. Enter the new discount date, or use the option:
|
<F2> |
To retain the old discount date |
|
Format |
MMDDYY |
|
Example |
Press <F2> |
Options
The discount balance may not be greater than, nor have the opposite sign from, the invoice balance. Enter the new discount balance, or use the option:
|
<F2> |
To retain the old discount balance |
|
Format |
999,999,999.99- |
|
Example |
Press <F2> |
Field number to change?
Options
Make any needed changes, or use one of the options:
|
<F3> |
To delete this modification (available only for an existing entry) |
|
<F5> |
To toggle between making the open item a correcting entry and a non-correcting one. This option is only available if you are interfaced to the General Ledger module and you have answered Y to the question Allow correcting entries? in G/L Control information. |
After making all changes, press <Enter> to proceed to another modification.
Use this modification type for an A/P open item that has been paid manually with a hand-written check.
If you paid a vendor with a credit card, we recommend that you enter it as a purchase from memo payment and assign it to the credit card pay-to vendor. See Entering Memos in the Payables chapter.
The distributions that result from this modification are a debit to accounts payable and credits to cash and discount taken.
If the payment was made from a cash account other than one of the cash accounts used in A/P, you must adjust entries to correct the distribution of cash. Such modifications can be made in the General Ledger module (General journal), or by entering a modification to distribution voucher, using Payables.
If several open items are to be paid with the same check, enter the amount paid and the discount taken for each open item as a separate modification. The voucher numbers you enter will differ, but the check number and check date will be the same. Manual payments will be shown as belonging to the same manual check payment on the A/P Check Register printed in Prepare payments/print checks.
|
Note |
If you partially paid a voucher and you are paying more on the same voucher, do not use the same check number as the previous payment. |
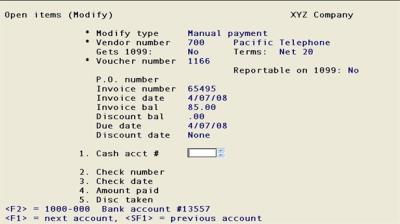
At this point the screen appears as follows:

|
Example |
Type M for "Mark voucher as manually paid" type Press <F1> for *Vendor number Press <F1> for *Voucher number |
Enter the information as follows:
Options
Enter the number of the cash account from which payment was made. This must be an existing entry in Cash accounts. You may use one of the options:
|
<F1> |
For the next entry in Cash accounts. If there is only one entry, the <F1> and <SF1> options do not appear. |
|
<SF1> |
For the previous cash account |
|
<F2> |
For the default cash account from Control information |
|
Format |
Your standard account number format, as defined in Company information |
|
Example |
Press <F2> |
If you are using positive pay and the account you select is set up for positive pay in Banks, when you post, a positive pay file will be generated. A message displays to let you know this will happen.
Enter the check number used to pay the open item.
|
Format |
999999 |
|
Example |
Type 104 |
Enter the check date for the check used.
|
Format |
MMDDYY The default is the system date. |
|
Example |
Press <Enter> |
Enter the full amount paid, including any discount taken. It must have the same sign as the invoice balance, and cannot be greater than the invoice balance.
This field is a replacement for, not an adjustment to, the corresponding field of the original open item. If you had entered $132.45 by mistake for $123.45, your entry here should be 123.45 (not 9.00-).
|
Format |
999,999,999.99- |
|
Example |
Type 5000 |
Enter the amount of the discount taken. The discount taken cannot be more than the amount paid, nor have an opposite sign from the amount paid.
|
Format |
99,999,999.99- |
|
Example |
Press <Enter> for no discount taken. |
Check amount
This field appears automatically after you enter the discount taken. The check amount is calculated as Amount Paid minus Disc Taken.
This field is only available if you are interfaced to the General Ledger module and you have answered Y to the question Allow correcting entries? in G/L Control information.
Check this box to make this a correcting entry. Leave it unchecked if not a correcting entry. You may also select <F5> at any time during the entry of the modification to toggle the correcting entry status on or off.
When you are finished, you may save the entry:
|
Save |
Alt+s |
To save a new modified open item or changes to an edited modified open item |
Character Mode Options
Options
Make any needed changes, or use one of the options:
|
<F3> |
To delete this modification (available only for an existing entry) |
|
<F5> |
To toggle between making the open item a correcting entry and a non-correcting one. This option is only available if you are interfaced to the General Ledger module and you have answered Y to the question Allow correcting entries? in G/L Control information. |
After making all changes, press <Enter> to proceed to another modification.
This selection is optional. It provides you with a printed list of all modifications so you can review them prior to posting.
Select
Edit list from the Open items menu or Modify open item edit list from the Reports menu.
No selection screen appears as all modifications are printed unconditionally. Select a printer as desired, or display the report on the screen. The Modify Open Item Edit List is identical in appearance to the Register and is not separately illustrated, unless directly interfaced to Check Reconciliation and you are posting a manual payment. In this case the register has additional information. See Manual Payments Posting.
This selection posts all modifications currently. After you run this, the modifications will have applied to the open items and there will no longer be any entries in the Open items (Enter) selection.
Select
Post from the Open items menu.
See a Modify Open item Register example in the Sample Reports appendix.
No selection screen appears as all modifications are posted unconditionally. Select a printer as desired. You may also select the Print to Disk option.
The Modify Open Item Register prints and the modifications are posted to A/P Open Items, Vendors, and A/P Distributions to G/L.
For manual payments, Vendors are updated to reflect the discounts taken and the distributions are posted to A/P Distributions to G/L for the accounts payable, cash, and discount accounts. The manual checks entered here show up on the next check register printed from Prepare payments / print checks.
With manual payment a positive pay file is generated and a positive pay register will print if:
| • | You you are setup to use positive pay and |
| • | The cash account you choose is set up in CTL > Banks. |
For positive pay setup instructions see the Implement Positive Pay and Direct Deposit appendix.
Transferring Modifications to Check Reconciliation
Per the Check Reconciliation Control information you may be setup to automatically transfer checks to the C/R Check Book (CKBOOK) during posting. When you are automatically transferring to Check Reconciliation, the Modify Open Item Register will include this in the legend:
Checks automatically transferred to Check Reconciliation
If you are not setup to automatically transfer, you must run the Transfer checks\deposits function on the C/R menu to pull the data into Check Reconciliation.